How To Enable DLNA Server in Windows 10

DLNA is a special software protocol which allows devices such as TVs and media boxes on your network to discover media content stored on your computer. This is quite useful, as it allows you to browse your media collection stored in one place with various devices. With a couple of clicks, you can enable the built-in DLNA server in Windows 10 and start streaming your media files.

DLNA (Digital Living Network Alliance) is a non-profit collaborative standards organization which is defining interoperability guidelines to enable sharing of digital media between multimedia devices. DLNA uses Universal Plug and Play (UPnP) for media management, discovery and control. UPnP defines the type of device that DLNA supports ("server", "renderer", "controller") and the mechanisms for accessing media over a network. The DLNA guidelines then apply a layer of restrictions over the types of media file format, encodings and resolutions that a device must support.

Windows 10 includes everything you need to utilize DLNA out of the box: a DLNA client, a (good) multimedia player and a DLNA server.

To Enable DLNA Server in Windows 10, do the following.

  1. Open the classic Control Panel.
  2. Navigate to Control Panel\Network and Internet\Network and Sharing Center.
  3. On the left, click on the link 'Change advanced sharing settings'.Change Advanced Sharing Settings Link
  4. On the right, expand the section All NewtorksExpand All Networks Section Sharing Center Windows 10
  5. Click on the link Choose media streaming options... under Media streaming.Choose Media Streaming Options Windows 10
  6. On the next page, click on the button Turn on media streamingTurn On Media Streaming Windows 10
  7. Name your network multimedia library and choose devices which will be able to read it.Enable DLNA Server In Windows 10You are done. Once finished, your personal folders such as Music, Pictures, and Videos will automatically become visible to any streaming device with UPnP support.

For instance, I can browse and play the files using my Android tablet with the DLNA software for Android installed.
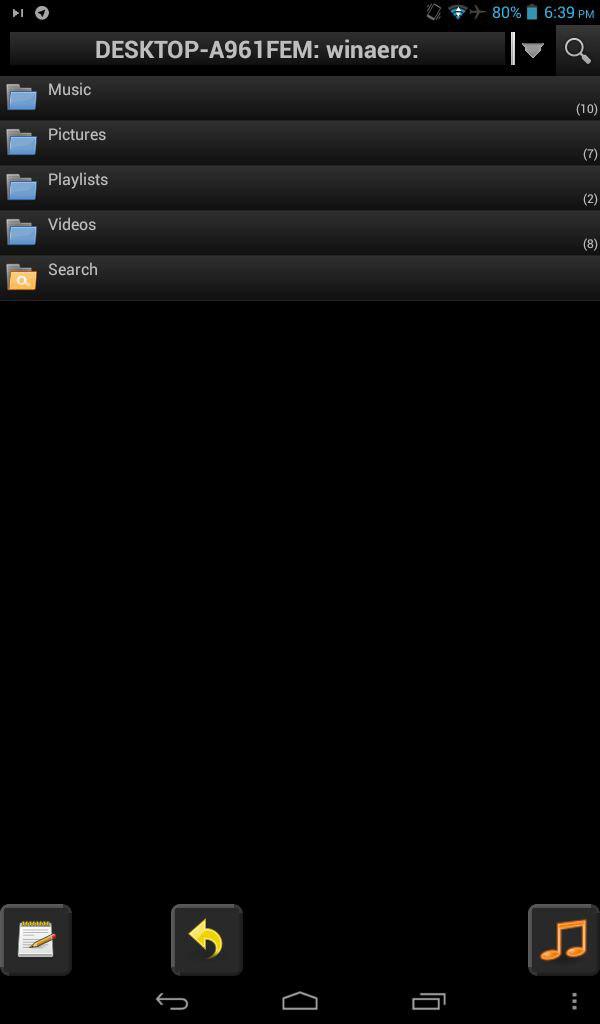
DLNA On Android

The built-in DLNA server can be disabled at any time. Here is how.

Disable the built-in DLNA server

  1. Press Win + R shortcut keys on the keyboard to open the Run dialog. Type services.msc in the Run box.Run Services Msc
  2. The Services console looks as follows.Services In Windows 10
  3. In the "Services" window, find the service named Windows Media Player Network Sharing Services.
  4. Double click and set the "Startup type" as "Manual".
  5. Stop the service.

Tip: You can open the Run dialog from the right-click context menu of the Start button or from the Win + X menu

Also, you might be interested in learning Win key shortcuts.

That's it.

OP: https://winaero.com/how-to-enable-dlna-server-in-windows-10/

Comments

Popular posts from this blog

Gujarati/Family relations

Gujarati/Family relations - Wikibooks, open books for an open world In Gujarati culture: These are the "titles" for family members. With the exception of Father, Mother, and Grandparents (who are called by the title only), all of these titles are added after the name of the person. Father: Papa or Bapuji Mother: Ba, Mummy or Maa Brother (also male cousins): Bhai (e.g. Haresh Bhai) Brother's Wife: Bhabhi (e.g. Komal Bhabhi) Sister (also female cousins): Ben (e.g. Mayuri Ben) Older Sister: Didi (e.g. Mayuri Didi) Sister's Husband: Banevi or Jijaji (e.g. mahesh Jijaji) Father's Younger Brother: Kaka (e.g. Rajesh Kaka) Father's Younger Brother's Wife: Kaki (e.g. Komal Kaki) Father's Older Brother: Kaka(e.g. Jiten Kaka) Father's Older Brother's Wife: Kaki (e.g. Bhavna Kaki) Father's Oldest Brother: Mota Kaka(e.g. Jiten Kaka) Father's Oldest Brother's Wife: Moti Kaki (e.g. Bhavna Kaki) Father's Sister: Foi,Fui (also ...

How to turn off Xiaomi "Don't cover the orange area" or "Don't cover the earphone area"

If you get the “Don’t cover the orange/earphone area of the screen” message when you turn on your phone’s screen all the time, it means that you’ve turned on the Prevent pocket dial feature and something is blocking the proximity sensor at the top part of your phone. Sometimes it's quite annoying and simple one-time solution is to press volume up & back button at a time to disable. Infact Prevent pocket dial is a good feature that prevents you from rejecting or picking up calls by accident when the phone is in your pocket by using the proximity sensor. If this feature isn’t working properly on your Xiaomi phone, the check whether anything is blocking area next to earphone where proximity sensor is placed. Mostly it caused by screen guard. You should remove it. If you still facing problem then here’s how to turn it off: 1. From your device’s Settings, tap Lock screen & password. 2. Slide the Prevent pocket dials switch to the off position. (Slider will be greye...

Disable Google Chrome extensions auto update

Disabling extension update: Edit preferences json-file for Google Chrome on Windows:  C:\Users\<USERNAME>\AppData\Local\Google\Chrome\User Data\Default\Preferences on Ubuntu for Chromium:  ${HOME}/.config/chromium/Default/Preferences In this file find the extension preferences block and set  "update_url"  property like  "http://localhost"  for example. For now according to given url updating of that extension is simply impossible. To locate that preferences block use extension id which you can find at  chrome://extensions/  page with "Developer mode" enabled. In simpler words, open "Preferences" file with wordpad and replace "update_url":"https://clients2.google.com/service/update2/crx" with   "update_url":"https://localhost" source:  https://productforums.google.com/d/msg/chrome/l3zOZeO-5-M/Y7VaR0KCWNIJ Disable all Google Chrome updates: 2.1. Any OS Just type  chrome://p...